User Management Guide
This guide walks through how to create and manage users via the Medplum App and via API. Medplum supports multiple authentication options, but always maintains a representation of the user identities, and gives developers control over which authentication method to use for an identity, as well as what access controls are applied.
Background: User Model
Medplum has several resources that represent user identities. The following resources are fundamental to building a correctly functioning application. This table describes how identities are represented in the system, and provides links to the administrative settings in the Medplum App.
| Resource | Description | Medplum App |
|---|---|---|
User | A resource that represents a user identity. Users exist above the Project level and can only be self-updated. | None |
Project | A Project is an isolated set of resources. See the Projects guide | Project Admin |
ProjectMembership | A ProjectMembership represents granting a user access to the resources within a Project. Inviting a user to a project, and specifying their profile and accessPolicy you can determine what set of resources they can access. | Invite (Admins only), Users (Admins only) |
Users
The User resource is the main resource that represents digital identity during authentication.
Users can have two different scopes, server or project:
- Server scoped users tend to be administrators and developers that need to access multiple projects.
- Project scoped users tend to be clinicians and patients that only need access to a single project.
See our guide on Project vs Server Scoped Users for more details.
Profiles
Within each project, a project member is represented by a specific FHIR resource, known as their profile. The ProjectMembership.profile element links the ProjectMembership to the profile resource.
A user's profile can be one of the three resource types in the table below. Incorporating the resources in the table below into ProjectMembership enable sophisticated access controls, as Access Policies can access the profile of the current user (read more)
| Resource | Description | Medplum App |
|---|---|---|
Patient | Patient is a fundamental FHIR resource and linking it to an identity allows the simple use case of granting access to personal records. | Patients |
Practitioner | Practitioners are staff members of a healthcare organization and generally have access to multiple patients' data. | Practitioner |
RelatedPerson | RelatedPerson is a family member or caregiver of a patient, who may be granted access to a small number of patient records | RelatedPerson |
There are several ProjectMembership.profile resources that are related to programmatic access, which serve as modifiers to the ProjectMembership resource (i.e. ProjectMembership.profile) and do not represent people, but rather applications that access data. This table describes the programmatic access profiles with links on where to set them up in the Medplum App.
| Resource | Description | Medplum App |
|---|---|---|
| ClientApplication | API Keys that allow programmatic access to resources | Client Applications |
| Bot | Event driven custom functions | Bots |
Creating a new Project
UI
The simplest way to create a project is to visit https://app.medplum.com/register and fill out the new project registration form.
If you are self-hosting, replace app.medplum.com with app.your-base-url.com
API
To create a new Project resource via the API, you will need to create a ClientApplication with super admin privileges.
Super admin features can cause unrepairable damage. We highly recommend adding an Access Policy to this ClientApplication to reduce it's privileges.
With is ClientApplication, you can create a Project resource and invite the a new user as a project admin.
Create a New Project
- Typescript
- CLI
- cURL
await medplum.createResource({
  resourceType: 'Project',
  name: 'ProjectName',
  strictMode: true,
});
medplum post Project '{"resourceType":"Project","name":"ProjectName","strictMode":true}'
curl 'https://api.medplum.com/admin/Project/' \
  -X POST \
  -H 'Authorization: Bearer ${accessToken}' \
  -H 'Content-Type: application/json' \
  --data-raw '{"resourceType":"Project","name":"ProjectName","strictMode":true}'
Invite a New User as an Admin
- Typescript
- CLI
- cURL
await medplum.post('admin/projects/example-project-id/invite', {
  resourceType: 'Practitioner',
  firstName: 'Alice',
  lastName: 'Smith',
  email: 'alicesmith@example.com',
  admin: true,
  scope: 'server',
});
medplum post admin/projects/example-project-id/invite \
'{
  "resourceType": "Practitioner",
  "firstName": "Alice",
  "lastName": "Smith",
  "email": "alicesmith@example.com",
  "admin": true
}'
curl 'https://api.medplum.com/admin/projects/example-project-id/invite' \
  -H 'Authorization: Bearer ${accessToken}' \
  -H 'Content-Type: application/json' \
  --data-raw '{"resourceType":"Practitioner","firstName":"Alice","lastName":"Smith","email":"alicesmith@example.com","admin":true}'
User Administration via Medplum App
Users in Medplum can be members of multiple projects, so cannot be edited directly. You'll need to invite a user to a project in order to grant access. If the user does not exist, it will be created when invited.
Creating Memberships
Only administrators can invite users, and can do so on the Invite page. You can specify a role and AccessPolicy at time of invite. The invite flow will do the following:
- Create a
Userif one does not already exist - Create a FHIR resource (Patient, Practitioner or RelatedPerson)
- Create a ProjectMembership that links User, ProfileResource and access policy
- (Optional) send an email invite user
Do not delete Patient, Practitioner or RelatedPerson resources that belong to ProjectMemberships. This will cause the login to be non-functional. Do not edit or change the ProjectMembership resources directly. If you do delete one of these resources, you will need to register a new project.
Deactivating Memberships
To deactivate a user's access to a project without deleting their membership, you can update the ProjectMembership resource and set the active property to false.
This is the preferred method for removing user access for several reasons:
- Immediate Effect: The user's access is immediately revoked.
- Audit Trail: The membership record is preserved, maintaining the history of the user's access.
- Clean Data: It avoids the need to delete and recreate memberships if access needs to be restored later.
- Cache Consistency: Deleting memberships can sometimes cause caching issues or "bursts" of deleted resource events. Deactivation is a cleaner state change.
Removing Memberships
To remove users from the existing project navigate to your Project settings and to the Users and Patient tabs respectively. Click on a specific users or patients and click Remove User.
We highly recommend leaving the associated FHIR resource (Patient, Practitioner, etc.) in place for audibility, record keeping and in case the membership needs to be reconstructed for some reason.
Searching for Project Members
You can search for all project members by performing a search for all ProjectMembership resources
Example: Search for all project members
- Typescript
- CLI
- cURL
await medplum.searchResources('ProjectMembership');
medplum get 'ProjectMembership'
curl 'https://api.medplum.com/fhir/R4/ProjectMembership' \
  -H 'authorization: Bearer $ACCESS_TOKEN' \
  -H 'content-type: application/fhir+json' \
You can also use the profile-type search parameter to narrow your search
Example: Search for all human members
- Typescript
- CLI
- cURL
await medplum.searchResources('ProjectMembership', 'profile-type:not=ClientApplication,Bot');
medplum get 'ProjectMembership?profile-type:not=ClientApplication,Bot'
curl 'https://api.medplum.com/fhir/R4/ProjectMembership?profile-type:not=ClientApplication,Bot' \
  -H 'authorization: Bearer $ACCESS_TOKEN' \
  -H 'content-type: application/fhir+json' \
Example: Search for all project Patients
- Typescript
- CLI
- cURL
await medplum.searchResources('ProjectMembership', 'profile-type=Patient');
medplum get 'ProjectMembership?profile-type=Patient'
curl 'https://api.medplum.com/fhir/R4/ProjectMembership?profile-type=Patient' \
  -H 'authorization: Bearer $ACCESS_TOKEN' \
  -H 'content-type: application/fhir+json' \
Example: Search for all project Practitioners
- Typescript
- CLI
- cURL
await medplum.searchResources('ProjectMembership', 'profile-type=Practitioner');
medplum get 'ProjectMembership?profile-type=Practitioner'
curl 'https://api.medplum.com/fhir/R4/ProjectMembership?profile-type=Practitioner' \
  -H 'authorization: Bearer $ACCESS_TOKEN' \
  -H 'content-type: application/fhir+json' \
Refer to our search documentation for more details on FHIR search
Promote Existing User to Admin
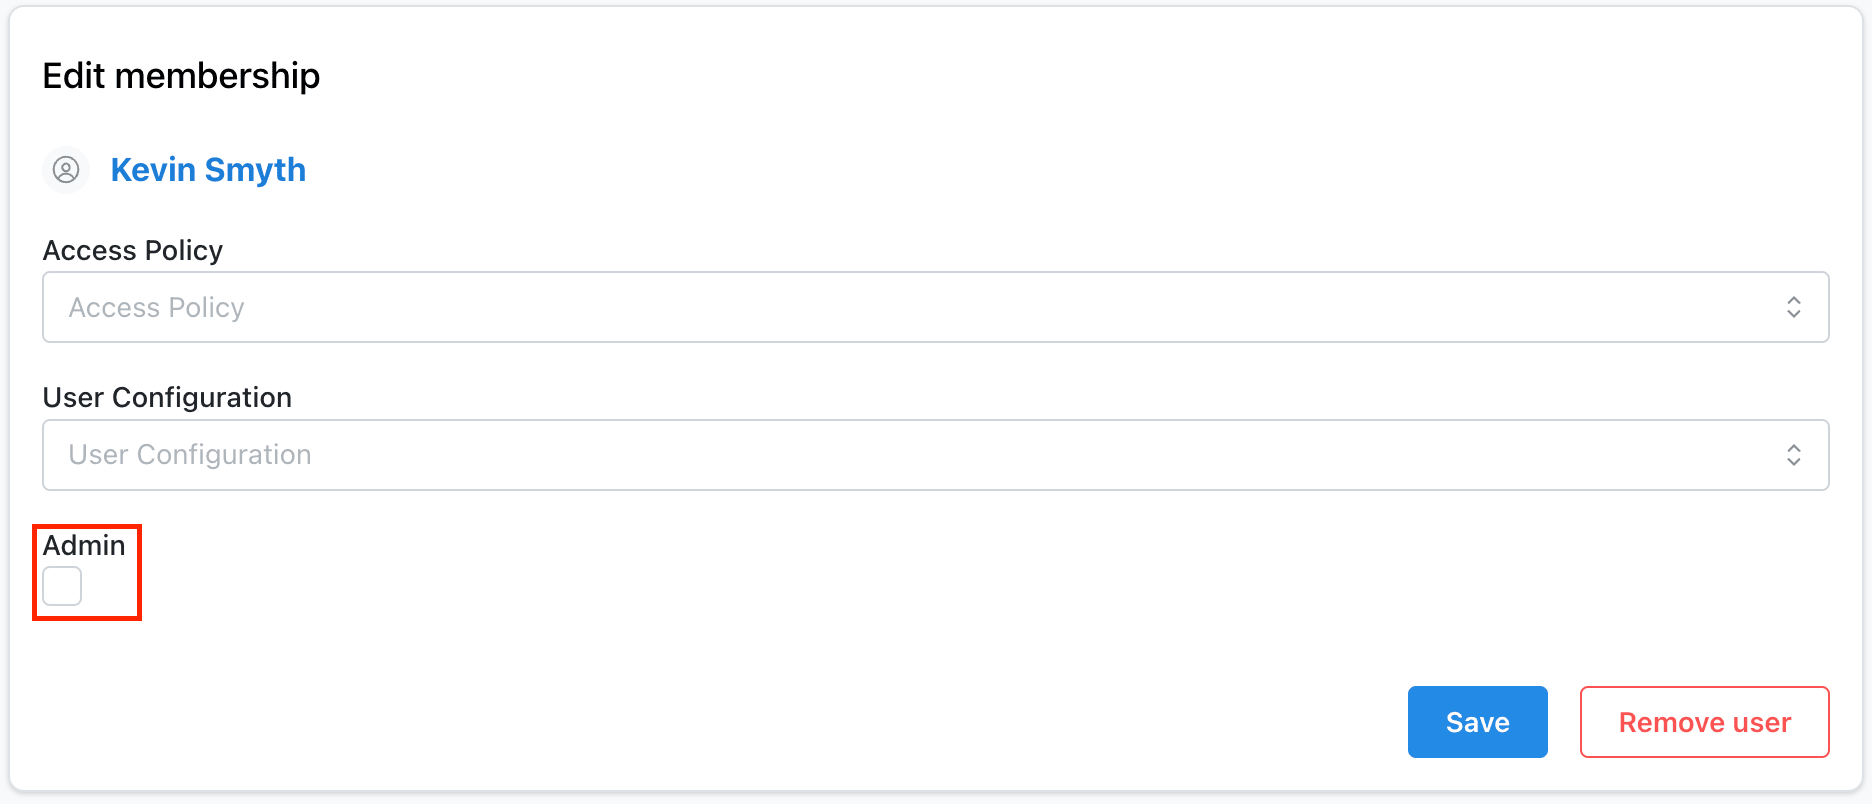
If you are already an admin, you can promote other existing users to an admin as well. To do so navigate to the Project Admin panel and go to the Users tab. From here, select the User you want to make an admin.
Check the box under the Admin label, and then save the user. This user will now be an admin on your project.
To invite a user as an admin in the app, please see the Invite a User docs.
Promoting a user to admin can also be done programmatically. To do so, you will need to update the user's ProjectMembership.
- Typescript
- CLI
- cURL
// The user's project membership
const membership = {
  resourceType: 'ProjectMembership',
  id: 'example-membership-id',
  // ...
  admin: false,
};

// For the updated membership, create a new resource and spread the original in, only changing the admin field
const updatedMembership = {
  ...membership,
  admin: true,
};

// Finally, post the updated membership to the API to make the user an admin
await medplum.post(`admin/projects/example-project-id/members/example-membership-id`, updatedMembership);
medplum patch 'admin/projects/example-project-id/members/example-membership-id' '[{"op": "replace", "path": "/admin", "value": true}]'
curl -X PATCH 'https://api.medplum.com/admin/projects/example-project-id/members/example-membership-id' \
  -H 'Authorization: Bearer ${accessToken} \
  -H 'Content-Type: application/json-patch+json' \
  --data-raw '[{
    "op": "replace",
    "path": "/admin",
    "value": true
  }]'
It is important to spread the original ProjectMembership to ensure that you are only updating the admin field.
Invite via API
Inviting users can be done programmatically using the /invite endpoint. Like inviting via the Medplum App, this can only be done by project admins.
Prepare JSON payload:
{
  "resourceType": "Patient",
  "firstName": "Homer",
  "lastName": "Simpson",
  "email": "homer@example.com",
  "sendEmail": false
}
Then POST to the /invite endpoint:
- Typescript
- CLI
- cURL
await medplum.post('/admin/projects/example-project-id/invite', {
  resourceType: 'Patient',
  firstName: 'Homer',
  lastName: 'Simpson',
  email: 'homer@example.com',
  sendEmail: false,
});
medplum post 'admin/projects/example-project-id/invite' '{"resourceType":"Patient","firstName":"Homer","lastName":"Simpson","email":"homer@example.com", "sendEmail":"false"}'
curl 'https://api.medplum.com/admin/projects/example-project-id/invite' \
  -H 'Authorization: Bearer ${accessToken}' \
  -H 'Content-Type: application/json' \
  --data-raw '{"resourceType":"Patient","firstName":"Homer","lastName":"Simpson","email":"homer@example.com", "sendEmail":"false"}'
The /invite endpoint creates a ProjectMembership. The ProjectMembership resource includes additional properties to customize the user experience. The /invite endpoint accepts a partial ProjectMembership in the membership property where you can provide membership details.
For example, use admin: true to make the new user a project administrator:
{
  "resourceType": "Patient",
  "firstName": "Homer",
  "lastName": "Simpson",
  "email": "homer@example.com",
  "membership": {
    "admin": true,
  },
}
Or use the access property to specify a user's AccessPolicy with optional parameters.
{
  "resourceType": "Patient",
  "firstName": "Homer",
  "lastName": "Simpson",
  "email": "homer@example.com",
  "membership": {
    "access": [
      {
        "policy": { "reference": "AccessPolicy/123" },
        "parameter": [
          {
            "name": "provider_organization",
            "valueReference": { "reference": "Organization/abc" }
          }
        ]
      },
      {
        "policy": { "reference": "AccessPolicy/123" },
        "parameter": [
          {
            "name": "provider_organization",
            "valueReference": { "reference": "Organization/def" }
          }
        ]
      }
    ]
  }
}
For more information, see the /invite endpoint API docs
See Access Control for more details.
Creating Practitioners via API is an advanced scenario and should be done with extreme caution. If you are planning to do programmatic creation of Practitioners, we highly recommend trying it in a test environment first and ensuring that the logins and associated access controls behave as expected.
Login Flowchart
The following diagram shows an overview of the process. Endpoints are provided to illustrate and inform, but implementors should only use OAuth endpoints or React components.
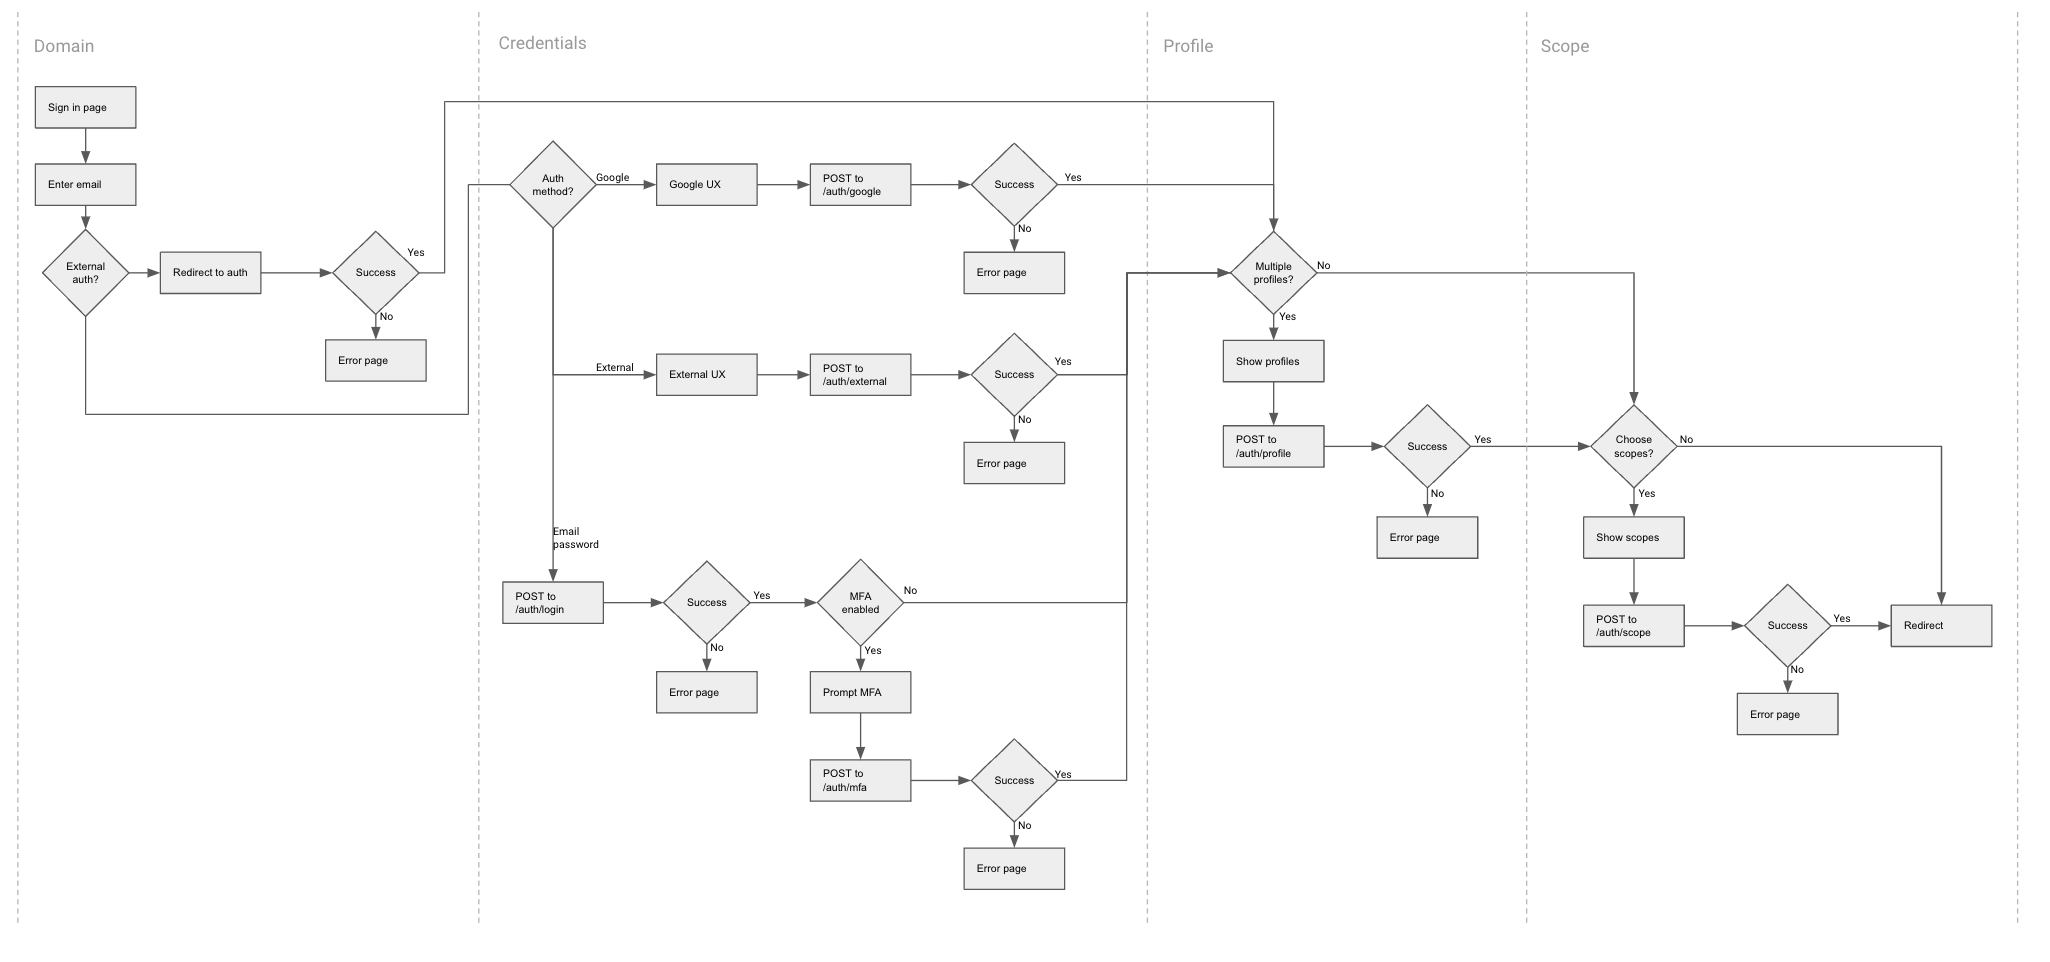
There are four major stages in the login flow: Domain, Credentials, Profile, Scope. The table below describes the authentication actions the Medplum server performs at each stage, along with the associated endpoints.
| Stage | Description | Involved endpoints |
|---|---|---|
| Domain | In the Domain phase, the preferred authentication method is determined, either by the user selecting a method, by configuration or based on email domain. | auth/method auth/external |
| Credentials | In the Credentials phase of login the authentication credentials are collected and sent to service of choice and authentication performed. | auth/login auth/external auth/mfa |
| Profile | In the Profile phase, if the user is a member of multiple projects, one must be selected to proceed | auth/profileauth/me |
| Scope | If SMART-on-FHIR scopes were provided, they need to be selected and access to them determined. Access control is applied where configured and authorization determined. | auth/scope |
Resources and Reference
- See authentication functions in the TypeScript SDK
- User profile in the TypeScript SDK
- OAuth endpoints reference
- Medplum resources related to authentication and authorization
- User registration react component
- Sign in form react component
- Auth Features and Fixes on Github