Intro to Medplum Agent
The Medplum Agent is an application that runs inside your firewall and connects to devices over low level protocols such as HL7/MLLP, ASTM, and DICOM. These network protocols are commonly unencrypted, and therefore require an adapter to a secure transport. The Medplum Agent uses secure HTTPS WebSocket channels to stream messages between devices and a Medplum server cluster in the cloud.
How it works
The Medplum Agent runs in your local network and connects to devices over low level protocols:
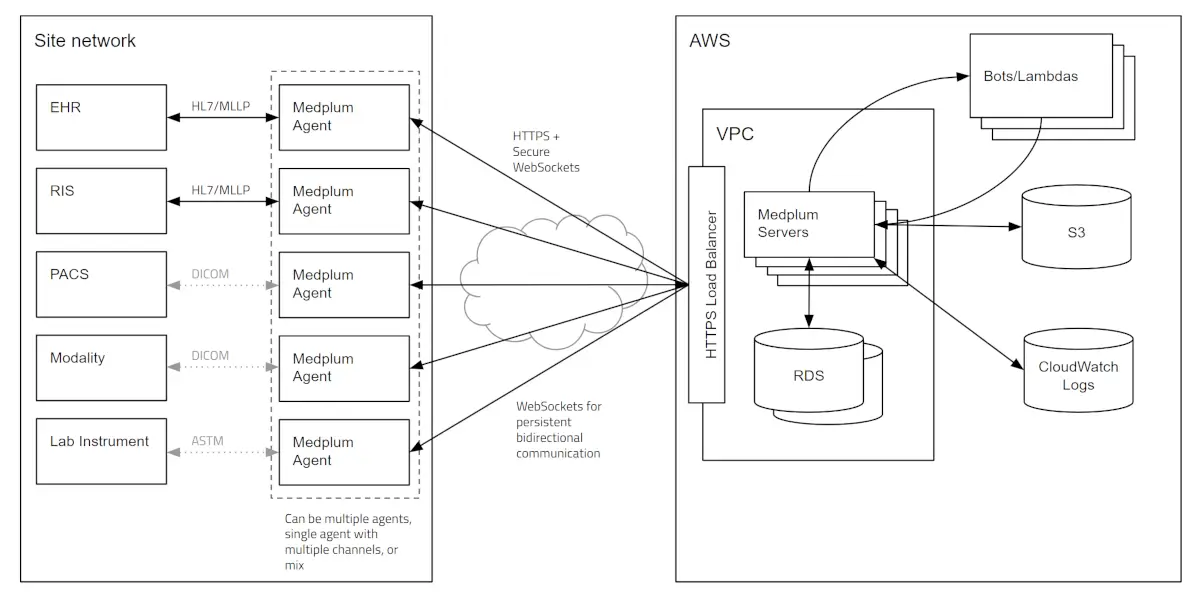
The Medplum Agent securely connects to Medplum servers running in the cloud using HTTPS and WebSockets:
Installation
The installation of the agent has two parts: first setting up the configurations on the Medplum app, then installing the application on the edge host and then inputting the configurations from the first step into the installer. After completing your install you'll be able to send test transmissions end-to-end.
Configuration on Medplum App
The Medplum App setup includes creating four resources which represent the configuration of the agent itself. These resources are Endpoint, Bot, Agent, and ClientApplication.
Set up an Endpoint Resource
First, set up the Endpoint. An endpoint is a representation of what the on-site system will connect to. For visibility you may consider adding a managingOrganization, address, contact, and related metadata the Endpoint to represent where this physical on-site system is.
Here is the link to create a new Endpoint on the Medplum App. Assuming you want to configure the Endpoint to listen to HL7 v2 over MLLP you'll want set up agent as follows:
{
  "resourceType": "Endpoint",
  "status": "active",
  "connectionType": {
    "system": "http://terminology.hl7.org/CodeSystem/endpoint-connection-type",
    "code": "hl7v2-mllp",
    "display": "HL7 v2 MLLP"
  },
  "name": "Test Endpoint",
  "payloadType": [
    {
      "coding": [
        {
          "system": "http://terminology.hl7.org/CodeSystem/endpoint-payload-type",
          "code": "any",
          "display": "Any"
        }
      ]
    }
  ],
  "address": "mllp://0.0.0.0:56000"
}
Set up a Bot Resource
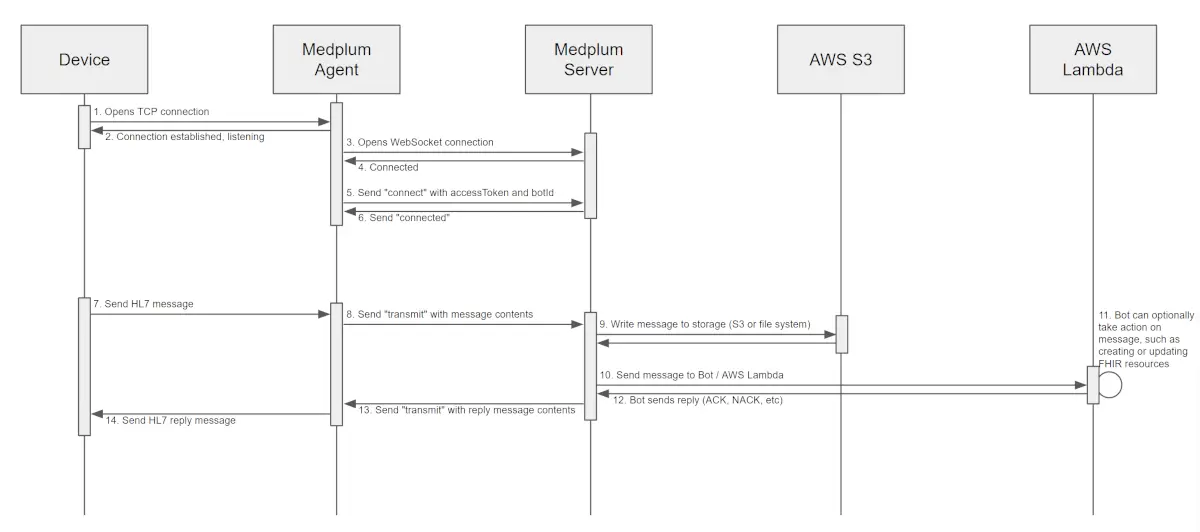
Second, set up the Bot that accepts the HL7 message, applies necessary transformations and translations, and sends an ACK message back to the sender. Ensure that your Bot accepts HL7 inputs, and you may refer to the HL7 Bots documentation for more advanced uses. For an initial setup, the minimal Bot may be used:
import { BotEvent, Hl7Message, MedplumClient } from '@medplum/core';

export async function handler(medplum: MedplumClient, event: BotEvent<Hl7Message>): Promise<Hl7Message> {
  return event.input.buildAck();
}
Set up an Agent Resource
Third, set up the Agent. This identifies the Agent in the field and helps route and manage the traffic from that agent appropriately. Give the Agent a descriptive name. You'll want to link the Agent to the Endpoint and Bot you created to support its setup.
{
  "resourceType": "Agent",
  "name": "ACME Hospital Admissions",
  "status": "active",
  "channel": [
    {
      "name": "ADT Channel",
      "endpoint": {
        "reference": "Endpoint/my-endpoint-uuid",
        "display": "Test Endpoint"
      },
      "targetReference": {
        "reference": "Bot/my-bot-uuid",
        "display": "HL7 ADT Processing Bot"
      }
    }
  ]
}
Set up a Client Application
Finally, set up your Client Application. While a default client may be used, we recommend setting up a new client for traceability. We also recommend setting up an AccessPolicy and attaching it to the ClientApplication you can restrict access to the host. The instructions on setting up access controls are available in the Admin panel.
At the end of the setup you should have the following items:
- Base Url - The base URL of your Medplum server, or https://api.medplum.com for hosted Medplum
ClientId/ClientSecret- obtain these from the ClientApplication you created or will use in the Medplum app.- Agent ID - this is the Agent
idUUID
You'll need the above to successfully install and connect the agent.
Install on Host
This guide walks through how to install the agent onto the host. The agent connects to Medplum using device authentication.
Running from Source via CLI
The agent can be run locally using the agent package directory in the Medplum repo. Keep the terminal open after setup so that you can see the logs. You can get started by following these steps:
- Clone the Medplum repo.
- Run the following commands from the top level of the repo.
npm ci
cd packages/agent
npm run agent <base_url> <client_id> <client_secret> <agent_id>
Windows Install
The agent executable for Windows is built with each release, and can be be downloaded from the Medplum Releases page.
To install on a Windows Host, remote into the host and download the agent executable to the host filesystem. Double click on the installer executable to start and go through the install screen, inputting the 4 pieces of information from the previous step into the screen.
Once the install is complete you should be able to see the following:
- The agent running as a Windows Service named "Medplum Agent"
- Check the Medplum Agent logs typically found at
C:\Program Files\Medplum Agentin a standard install
Linux Install
The Linux version of the Medplum Agent is currently available as a standalone binary. You can get started by following these steps:
- Download the latest Linux binary from the Medplum Releases page.
- Make the binary executable
chmod +x medplum-agent-linux
- Run the agent with your configuration parameters
./medplum-agent-linux <base_url> <client_id> <client_secret> <agent_id>
Docker Image
For instructions on building and running the Docker image for the Medplum Agent, please refer to the Medplum Agent package documentation.
Testing your Setup
Go through the following checklist to ensure that your setup is working.
Testing a site install
- When you log into the host, ensure that the agent is running
- Send a message to the Agent for testing
- Confirm that the logs on the agent host
- Navigate to your
Boton the Medplum App and view theEventstab, confirm that you see the AuditEvents produced
Testing HL7 with Medplum CLI
For a simple end-to-end test of HL7 over MLLP, we recommend using Medplum CLI as follows.
Install the Medplum CLI if you have not done so already:
npm install --global @medplum/cli
See Medplum CLI for more detailed installation instructions.
Then send a test message:
medplum hl7 send localhost 56000 --generate-example
You can also send a specific test message, stored in a .hl7, similar extension (.oru, .adt, etc.), or .txt. file, via the following command:
npx medplum hl7 send localhost 56000 --file <some-file.hl7>
There should now be an AuditEvent in Medplum for the message.
Testing HL7 with Sim Hospital
For a more comprehensive end-to-end test of HL7 over MLLP, we recommend using Sim Hospital as follows. (Assumes you have docker installed)
docker run --rm -it -p 8000:8000 eu.gcr.io/simhospital-images/simhospital:latest health/simulator -output mllp -mllp_destination <ip_address>:<port> -pathways_per_hour 720
If you are testing your local setup on Linux/Mac with the agent running in docker you will need to do the following:
docker run --rm -it -p 8000:8000 eu.gcr.io/simhospital-images/simhospital:latest health/simulator -output mllp -mllp_destination host.docker.internal:<port> -pathways_per_hour 720
Audit Events and Logging
All interactions between a Bot and an Agent, such as calling Agent operations from a Bot or calling Agent operations that $execute a Bot, will trigger either the creation of AuditEvent resources or the configured logging behavior for the Bot (see: Bot logging configuration).
Because a reference to the Agent that interacted with the Bot is logged in the AuditEvent created by the Bot, these events will show up in the Events tab for both the Bot and the Agent.
These are not duplicated AuditEvent resources but rather the same resource showing up in both Event log views.
Preparing for Scale
HL7 Feeds can be extremely high volume, and before you go live with a high-volume feed you may want to modify your Bot to log only set the Bot AuditEventDestination to log.
Supported Protocols
- HL7 v2: A widely used low-level message protocol for healthcare data exchange.
- DICOM: A protocol used for storing metadata about medical images. Currently, Medplum supports the C-STORE and C-ECHO operations. Support for other DICOM operations such C-FIND, C-GET, and C-MOVE is coming soon.
- ASTM: Used to transfer data between clinical instruments and computer systems. ASTM support is still in alpha.
See also
- Medplum Agent
- Medplum Agent design discussion
- Medplum WebSockets design discussion
- FHIR WebSocket Subscriptions
- FHIRcast
- Medplum CLI
- Sim Hospital is a useful tool to generate HL7 V2 test messages locally for testing
- Medplum Agent Demo Video on Youtube